In this video, I show you how to use install Topaz Adjust (which is a Photoshop plugin) into GIMP and how to use it to enhance the colors of your digital photos and digital art.
In this video, I show you how to use Install Topaz Adjust (which is a Photoshop plugin) into GIMP and how to use it to enhance the colors of your digital photos and digital art.
This one is for my fellow render artists out there. Anne Marie Rasmussen, editor of Dog Gone Art Magazine has recently published a new book that introduces folks to Daz Studio. I am eagerly awaiting my copy and I’ll hopefully have more to tell you about it soon. In the meantime, pop over and check out her blog where, in addition to selling her book, she also reviews products for use in Daz Studio.
Here’s tip for you artists out there. Look into Outlook.com. I use it extensively. You may already have tools for doing similar things, but, if you don’t, it’s something you may want to check out.
What is Outlook.com
It’s is a website run by Microsoft that gives access to a number of tools and services that I find indispensable for my online art business. Most of what is has to offer can be found elsewhere, for instance, Google offers similar services, but I find that Outlook.com just seems to do things more smoothly. Oh yeah…it’s free (up to 15 Gigabytes).
What does Outlook.com offer
Here’s a quick list of what it includes:
An Email Account
A place to store contacts
A calendar
Cloud file storage (OneDrive)
Word processing (Word)
Spreadsheets (Excel)
Slideshow presentations (Powerpoint)
OneNote
Office Online
Now, I don’t use all of these service but a do use some of them. I use the email to act as the source of my email marketing campaign; and, for writing commission contracts and license agreements, I use the online Word feature; but, for me, the most useful feature is OneDrive. I use OneDrive for transferring high resolution images that are too big for email to licensees, publishers, and anyone else who needs a digital version of a work. I also use it to share wallpapers to my newsletter recipients.
Why I Prefer Outlook.com
There are a couple of reasons why I think Outlook.com is better than the competing services:
When I first started my email campaign, I used my trusty old Yahoo address. The problem was that none of my emails appeared to generate any sales or traffic to my site. It turns out that any emails sent from an email campaign management service with a Yahoo address automatically are destroyed without notification by mail servers. Apparently, there are some other email providers that have this same problem.
Outlook.com does not have this problem through. Once I started using it as my email campaign source, I started getting results.
OneDrive Shares Files Unconditionally
I used to try and share files using Google Drive. The problem was that Google Drive required recipients to have a Google account of their own. Many of my clients are not that computer saavy and did not want to have to register for yet another online account just to receive the illustration I had made for them. Thankfully, OneDrive allows me to generate a link to share a file and anyone with that link can get it.
I hear that Google has since changed their policy, but, for me, the damage is already done. I’m used to sharing files the OneDrive way.
If you are not using Outlook.com, I suggest checking it out. It can be really useful stuff, and it won’t cost you anything to get started. Google offers similar services and I’m sure there are a few others, but for some reason, I just find that I like Outlook.com best.
Yes, I know this whole article sounds a bit like a paid ad, but it isn’t. It’s just a service I really like and wanted to share.
Regards,
Daniel
P.S. If you liked this article, please consider signing up for my newsletter. I send it out every Wednesday and it includes links to my latest artworks, articles, and videos, as well as discounts, deals, and freebies!
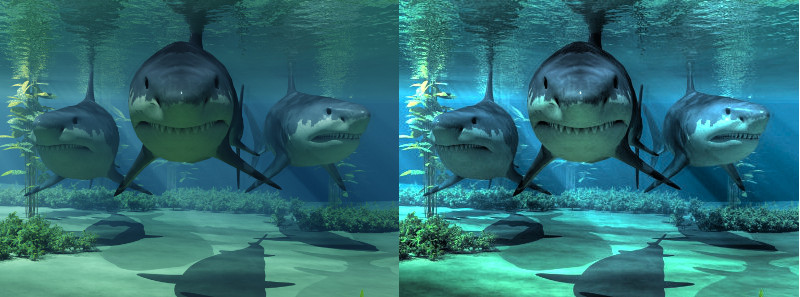
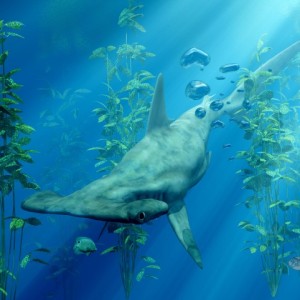
A before and after shot of using Photomatix to enhance an image. Note: clicking on the image will take you to the Amazon page for Photomatix. Photomatix is a tool used to create HDR images. HDR stands for High Dynamic Range. Essentially, the goal of HDR is to better mimic the way humans really see something. A regular photo only covers a certain range of values, and, as a result, areas in deep shadow or bright light lose detail. HDR solves this by combining under and over exposed images to recover that detail.
I, however, have found that Photomatix is really quite good at enhancing my digital art. I just create three versions of an image using image editing software: a light, dark, and middle value version. I then use Photomatix to recombine them. The result is quite often superior images in terms of both color and value. Above, you can see the results on one of my shark images. Notice how the colors in the “after” image on the right are so much richer, and the range of values much fuller.
If you’d like to try Photomatix, it’s available at Amazon:
Please note that this is an affiliate link, and I do get a small commission if you buy Photomatix from Amazon today. This will be at no extra cost to you. For those who do buy, THANK YOU!
Do you want to see me using in action. Check out this video that I made:
A quick 10 minute video I put together on a tool I use to manage my art posts on Facebook and Twitter #hootsuite
Here’s the link I mention in the video http://www.introvertartist.com/hoot
Almost all of my art includes characters of some sort. These characters are usually animals, creatures, or people, but also may include unique trees, skulls, dwellings, vehicles…anything that is meant to stand out in my images. Sometimes, I will sculpt a character from scratch using something like Scupltris, but often I will just use pre-existing characters, and for these, you really have two really good choices in tools to pose them:
Poser was the first on the scene to allow artists to pose virtual characters. Originally, it was intended to be used as a tool for artists needing pose references, but quickly it became a way of making art unto itself. Not only can you load and pose characters, you can also render completed scenes with it. That means it can simulate the effects of light and atmosphere and take a virtual snapshot of a scene with the posed characters.
I like it because it has a great interface that is easy to use and fast to pose characters. I also like that the native poser file format is compatible with Vue, the application that I use to build and render scenes. Also, Poser has a very powerful cloth simulator built in. A cloth simulator turns an object into virtual clothing recreating the effects of gravity and wind on an objects as it is draped over a character. Poser also has a few other features that I don’t use very often myself, but might still be useful to you including a hair and fur simulator, a feature that allows you to apply photographs of people’s faces to virtual characters, animation, limited sculpting capability, and a rather advanced material editor.
For a digital art tool, Poser is not very expensive. You can often get it on sale for less than $100. If you’d like to try it, you can check it out by clicking on the link below.
Daz StudioDaz Studio is the leading competitor to Poser. It can pose all of the same characters, plus a few more that Poser may not handle well. What’s really nice about it is that it is FREE! However, if you want to do some of the more fancy things with it, you need to purchase plug-ins. For instance, the cloth simulation will set you back $50 dollars.
I find the UI not nearly as fluid as Poser. Personally, I would not use Daz Studio if not for one thing: It has a plugin called LookAtMyHair which I have found to be the best system for adding fur to animals. With mammals being one of the primary subjects of my art, that’s rather important to me.
If you are interested in trying Daz Studio, click on the link below.
Where to Get Characters for Poser and DazStudio
There are lots of sites out there where you can get characters that will work in Poser and Daz Studio. The two I recommend are:
Daz3d.com – These are the same people who make Daz Studio (not surprising considering the name). They have perhaps the largest library of characters, but be careful, some may only work well in Daz Studio.
Renderosity – Renderosity started as a social network site for 3D artists, but they have a great store too. They don’t have as many characters as Daz3d, but they have tons of things to add on to characters such as clothes and hair. Their prices tend to be a little better, too.
_____________________________________
If you want to get started in 3D art, either Poser or Daz Studio is a great tool to look into, but be careful, you might easily become obsessed with making 3D art 🙂
Regards,
Daniel
P.S. If you liked this article, please consider signing up for my newsletter. I send it out every Wednesday and it includes links to my latest artworks, articles, and videos, as well as discounts, deals, and freebies!
P.P.S.
By the way, the links to other sites in this article are affiliate links. If you click on them and should happen to buy glow within the next few weeks, I will get a small commission on the sale. It does not raise the price for you. For those of you who do buy, THANK YOU!
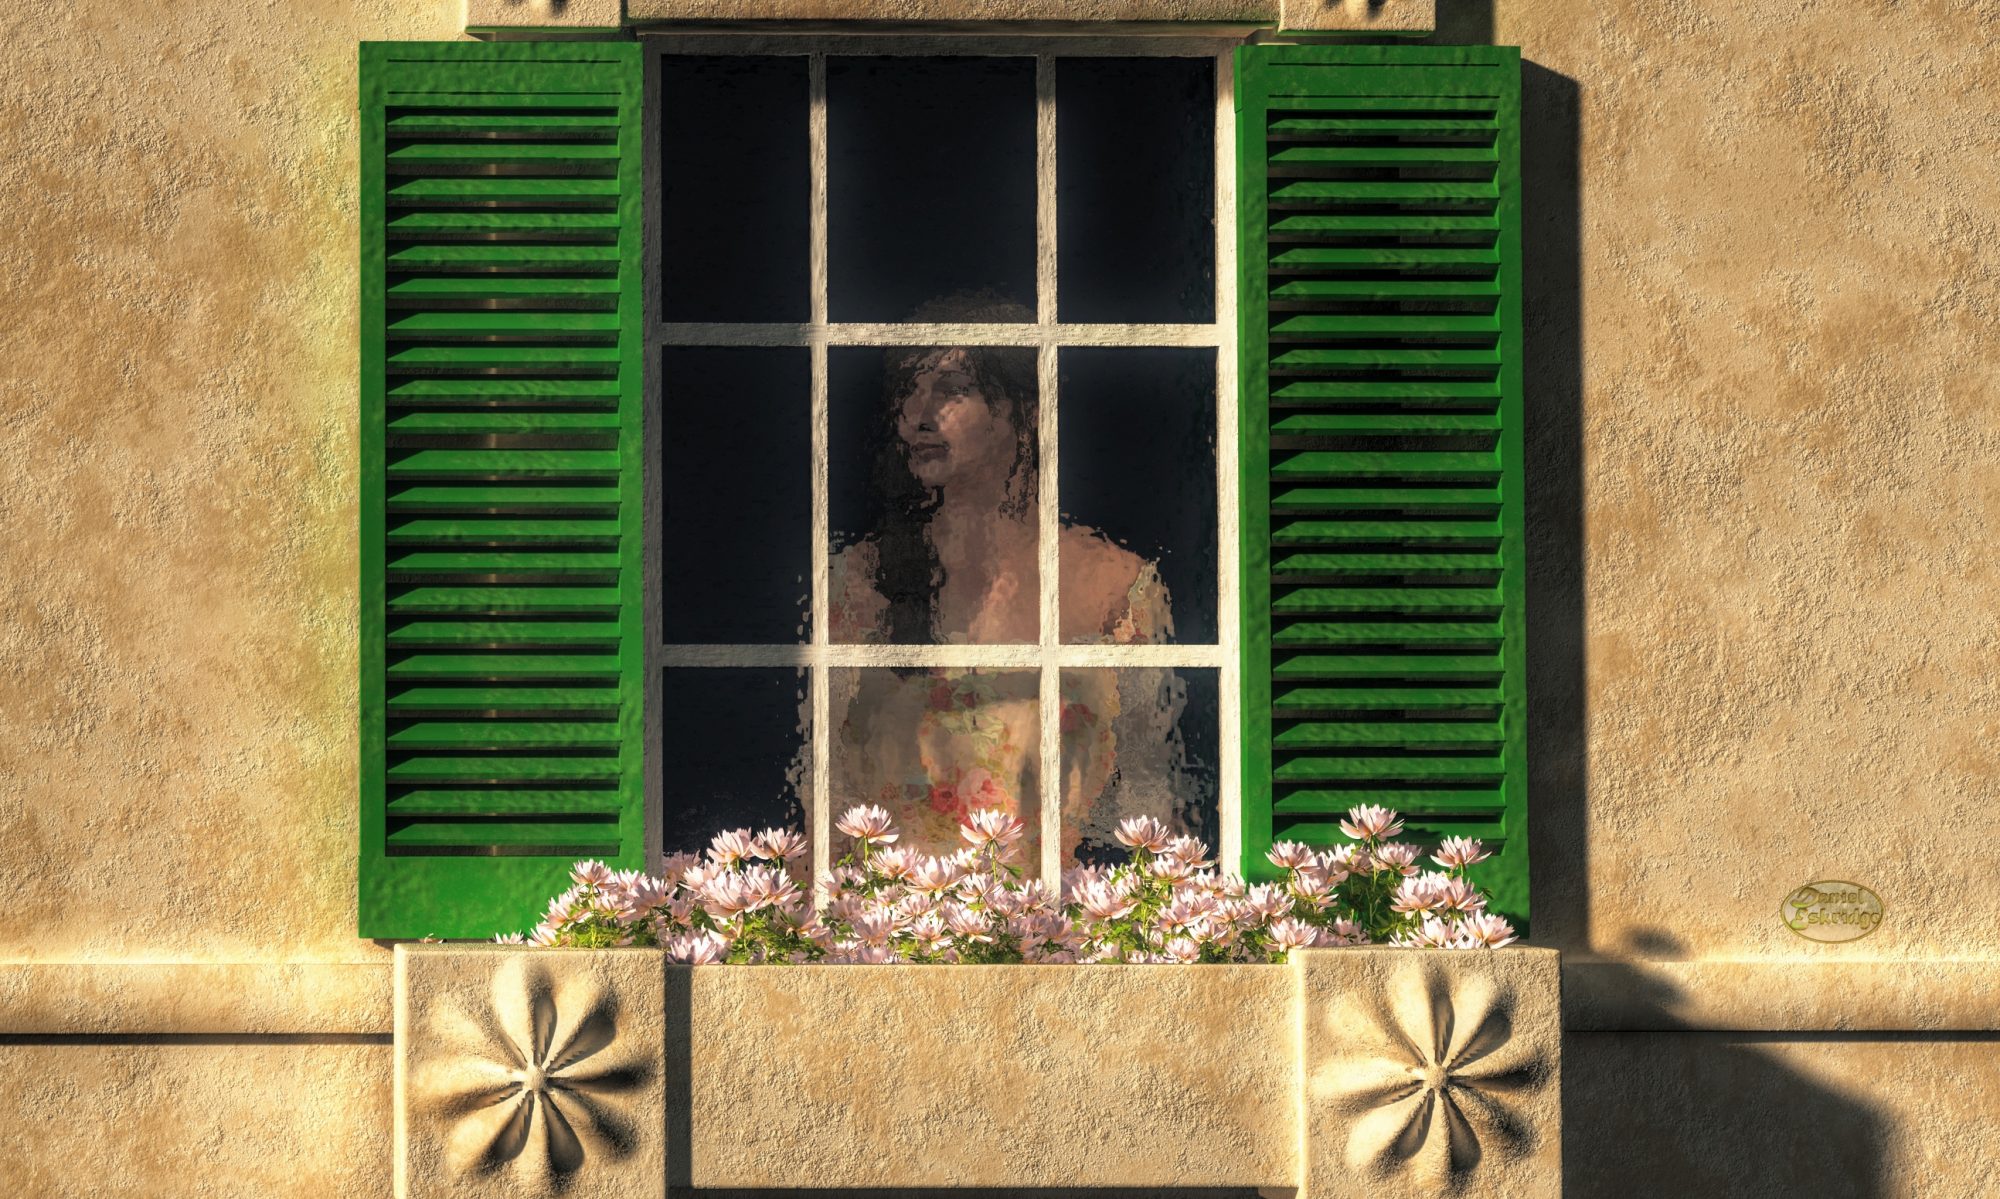
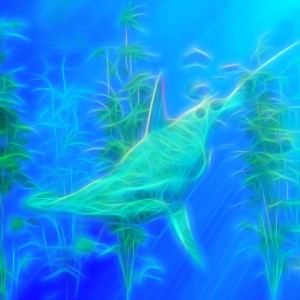
My “Hammerhead” image AFTER processing with GlowA hammerhead shark swims beneath the sea in this impressionist work featuring fluid glowing lines with an almost neon quality to them.
This was actually made from an older image of mine that was a realistic image of a hammerhead shark, created using digital 3D rendering techniques. I’ve altered it though using a tool called Glow From Topaz labs. It’s a really cool computer program that gives your images a wild expressionist look ranging from a style reminiscent of Vincent Van Gogh to modernist neon impressionism.
My “Hammerhead” image before processing in GlowI’d seen a lot of photographers making sales with their photos that had been run through Topaz Glow. They looked awesome and I knew I wanted to give the application a try with some of my render art. It required me to update the drivers on my graphics card, but once I did that, it was easy to install and very easy to use.
I found that it doesn’t always make an image better, but for some it really had some great results. This particular image, I thought, turned out very well.
If you’d like to check out Topaz Glow, and I recommend that you do, you can click on this link:
By the way, that link is an affiliate link. If you click on it and should happen to buy glow within 30 days, I will get a small commission on the sale. It does not raise the price for you. For those of you who do buy, THANK YOU!
Regards,
Daniel
P.S. If you liked this article, please consider signing up for my newsletter. I send it out every Wednesday and it includes links to my latest artworks, articles, and videos, as well as discounts, deals, and freebies!
I recently did a video review of the art program Impression from Topaz. It’s a great tool for adding style to your digital photos and art. Check it out.
Hey, everybody, I’ve got a really cool product to tell you about today.
It’s called Topaz Impression, and it’s a really great way of adding some unique styling to your photos and your digital art.
It should take me about eight minutes, and it should be pretty quick.
So without further ado, let’s get started.
Alright, so here I’ve loaded Topaz Impression.
As you can see, it starts with an image.
This is the default that comes with the application.
We’re not going to use this today.
I’m going to use one of my own images.
Now, typically you’d load a photograph in this, but, since I’m not a photographer, I’m just going to load up one of my artworks.
And, to load up something, you just go to the top menu here, select “open”, and find your file.
I’m going to use my “Iguana Coffee” image.
You can see here: it loads the image and then it starts to immediately apply…I think this first preset up here…which is “Charcoal 1”.
We’ll get to the presets in just a minute, though.
…couple of things to show you first
You have different ways of viewing you enhanced version and the original side by side, or top and bottom.
This is a kind of a neat little feature here where you can sort of see how much it’s changed, how much Topaz has changed it.
Here’s side by side full versions and top and bottom full versions.
I’m just going to go the the filtered version thoough.
This is just a quick zoom feature.
And, this is just another way of viewing that zoom.
And then, you can also just snap to the original.
Let’s turn the original off, and zoom to this level.
Down here at the bottom, I beleive this is the strength of the filter
Right, So, this is how much the filter is applied to your original image, and there’s various blend modes here to change the way that you…that the two are mixed together.
So you can say…multiply…screen…some fun things to play with.
And now over here, on the right hand side you have presets.
Let’s go back to normal blend mode and 100% strength.
And this is really just a starting point for whatever filter you want to use.
And they also have sets of these presets.
So, we’ll go with the “Ancient” preset.
Here’s some interesting looking ones…go with “Cracked Fresco”.
That’s kind of interesting, but I don’t think I like that one.
Let’s try “Cave Dweller”.
That one’s really wild!
Anyway, we can…once you’ve kind of picked a preset that you like…
Let’s try impressionistic…and, “Monet 1”
It looks kind of painting like.
Anyway, once you’ve picked a preset you like, you can click on this set up here, and this will take you to the individual parameters for your…for your image.
You can pick like your brush style…pick maybe a finer brush…the size of that brush…a whole bunch of other things.
I’m not going to show you all of them for time’s sake.
But, it’s a lot of fun to just figure out what works for you.
Let’s see…whoa!…That’s a little bit too extreme there.
Alright…stroke length…
Well, you get it to pretty much where you like it, and then…a few other things to cover.
You have down here the color section.
This is the same kind of color adjustments you can make in any program, such as GIMP or Photoshop…you can do them here as well.
You can change the hue and the saturation as well as the lightness…contrast.
This vignette thing here sort of gives it a spotlight type effect.
Let’s turn it way up here so you can kinda see it.
So…as if you are looking at it under a concetrated light.
Light Direction I think applies to this texture stuff down here.
Now, texture is what you do to kind of…give the image a look like as if it was painted on a canvas.
I like this “canvas 3” here.
You can’t really see it here just yet until I turn the strength up.
Turn it WAY up…and, reduce the size a little bit.
And now this really looks like it was painted on a canvas…I mean…this would fool a lot of people.
Now, my signature down here has been kind of destroyed, but the rest of the image is looking pretty good.
When you get to a point that you like, you can…save the presets. So you can apply this to other images of yours.
And this is kind of, would, is a way of working towards a consistent style.
So you just click the “plus” button up here and the pick a place to save it and then give it a name…call it “MyImpression2” on this one.
And now, that should be saved.
I’m not going to go back an look at it now.
When your ready, though, you can save your image by clicking on the “Save As” button down here, and…I’ve save this one before as…you gotta be careful when it…the first time you try to save it, this is what I got and it was the original name of the file, and it would overwrite the original file,
and I don’t want to do that.
Okay, and now I can go to my desktop and have a look at the file.
Okay, so here’s the original…and then here is the enhanced version.
You can see it’s definitely got a much more painterly look to it.
So, I’ve experimented with this a little bit with a few of my images,
and here I have one that I uploaded last September of a…Beachcraft Staggerwing.
And…um…I actually sold a print of this within just a few weeks, and…won a few contests as well.
So, it’s sucessful!
I mean, I’m probably not gonna…probably not gonna use this for most of my images, but it’s sort of a…an interesting thing to do every once in a while.
So, if you…wanna try Topaz Impression…in the description of this video, there will be a link to the Topaz site.
Or, if you want, you can…I have a forwarded link…in a…from my blog: go to www.introvertartist.com/impression, and it will take you to the site.
And from here you can buy it!
Now, in a…for a…in all honesty that is a…an affiliate link, so I will get a small commission if you do happen to buy Topaz Impression within the first thirty days of visiting the site.
So if you liked this video and you’d like to see more, ore read my articles, or even see some of my latest art, you can always follow me on Facebook at www.Facebook.com/TheArtOfDanielEskridge
So, thanks, everybody, and goodnight!
In this video I introduce you one of my favorite digital sculpting applications. Not only is Sculptris easy to use, but it is remarkably powerful. Plus, it is FREE!