To get Topaz Impression 2: http://www.topazlabs.com/1037-23-3-21.html
In this video, I show you how to use the new masking feature in Topaz Impression 2 to control the detail level on parts of your image.
If your interesting in seeing my more thorough tutorial on using Topaz Impression 1 (which is mostly the same as 2): https://youtu.be/VMp2YH5QAsQ
In this video, I give a Blender3D tutorial on how to model a pipes of pan. It will make a nice prop that can be used in just about any 3D application.
This is a beginner level tutorial. In it I’ll go over creating a cylinder, resizing objects, subdividing edges, duplicating objects, and extruding edges.
In this video I show you how to sculpt and paint a tree trunk model using Sculptris. Afterwards I’ll show you how to import that model into both Poser and Daz Studio.
Sculptris is free and you can get it here: http://pixologic.com/sculptris/
In this video, I give a start to finish tutorial on creating an artwork using Poser, Vue and Gimp. I’ll show you how to create a sky scene in Vue filled with bright clouds. Next, I’ll take to Poser’s cloth room to pose a female figure wearing a dress that flutters in the wind. Finally, I’ll show you a few post production steps in GIMP.
If you are interested in the resources I used to make this scene:
Victoria 4, the female model: http://introvertartist.com/v4
Dress: http://www.IntrovertArtist.com/Dress
Hair: https://www.renderosity.com/mod/bcs/liltsure-long-hair-v-2/43552
Vue: http://IntrovertArtist.com/Vue
Poser: http://IntrovertArtist.com/Poser
GIMP: http://IntrovertArtist.com/Gimp
In this video I show you how to take a model from Daz Studio (the millenium sub dragon – to get the dragon, go here: http://IntrovertArtist.com/dragon) and retexture it using ZBrush. The special part of this is that the model has multiple UV Maps, which adds a level of complexity to this task.
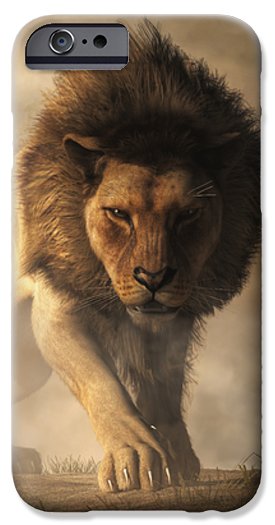
A phone case I offer though my FineArtAmerica account.While I prefer sales of prints to be how I make money with my art online, there are alternative ways to so. One I’ve mentioned before is to use Zazzle to sell your art as designs on products such as coffee mugs and phone cases. However, not long ago, the service I use to sell prints, FineArtAmerica.com recently added phone cases to their offering.
They are only available through FAA’s sister site Pixels.com. So if you send people to your art on FineArtAmerica, visitors will only see the Fine art and home decor offerings, not the phone cases. You don’t need to do anything extra to have your art appear on Pixels.com, it will do so automatically when you add art to FAA, but you DO need to specify mark-up’s on the phone case to have them available on Pixels. Also, if you pay the $30 a year registration, phone cases will appear on your artist web page.
Now you could just use Zazzle to offer a phone case featuring your art, but I prefer Pixels for three reasons:
The User Interface on Pixels.com is way easier to deal with. On Zazzle, customers have to switch to “customize” mode to move and resize the image on the phone case. Pixels, on the other hand allows user to quickly and smoothly drag the image around, rotate with a drop down selection, and resize with a responsive slider.
Adding products to FAA/Pixels is usually bug free where as Zazzle has horrible problems with creating products, particularly if you try to use the Quick Create tool.
FAA’s fixed amount markup allows me to make a larger commission with a phone that costs the customer less. For instance, if I set a mark-up of 1$0, the case will sell for $40 on Pixels. To get $10 on Zazzle, I have to set a commission rate of 21.5% which sets the cost of the case at $48.95…that’s a 22% increase to the customer. Plus, Zazzle charges $2 more in shipping.
So, if you are looking for an alternative to just selling prints, I suggest checking out FAA’s phone case offering for makeing some money off of your art.
Regards,
Daniel
P.S. If you liked this article, please consider signing up for my newsletter. I send it out every Wednesday and it includes links to my latest artworks, articles, and videos, as well as discounts, deals, and freebies!
Like this? Get my newsletter: http://IntrovertArtist.com/Newsletter
In this video I show you from how I created the scene “The Moose”. I start by showing you how to create a wintry forest in Vue, then how to use the scene generated from Vue as a background in Daz Studio where the moose is rendered. Finally, I show you how to use GIMP to better integrate the two renders and do some post production work.
Like this? Get my newsletter: http://IntrovertArtist.com/Newsletter
In this video I show you from how I created the scene “Eagle Warrior 2”. I’ll show you how to create a rocky mountain in Vue using a procedural terrain. I’ll also show you how you can merge two Vue scenes. Finally, I’ll show you how to create depth in post production using the Vue depth map in GIMP.
I’ve been posting my art to my Facebook Fan Page for a few years now. Occasionally, if I thought a work was particularly good, I would use the Facebook Advertisement system to boost the post. Sometimes those boosted posts would produce wonderful results, but other times, I was pretty much just wasting money.
The problem was that I didn’t have a clear idea of which artworks found a large audience and which didn’t. Sure, I might have liked a piece, but that didn’t mean anyone else did. The result was that I would sometimes boost posts (spend money), but get no clicks, likes, comments…nothing, and, most especially, no sales. I needed a way to know which of my artworks garnered a larger response.
It turns out, the solution was right there at the top of the screen. When you log in to your Facebook Fan Page, you’ll see a menu across the top. One of the selections is labeled “Insights”. If you go there, you get access to a huge amount of reports regarding the performance of your Fan Page and its posts.
It would take a book for me to go through all the benefits of this feature. However, today, I want to focus on just how I use Insights to figure out the best posts to boost. It’s really quite easy:
Once logged into my Fan Page, I click on “Insights” at the top of the page
In the sub menu that appears on the next line, I click “Posts”, and a list of posts appears at the bottom under the graphs
Just above the list, on the far right, I click on the down arrow next to “Post Clicks | Likes, Comments, & Shares” and choose “Engagement Rate”
Now there is something interesting to look at. The second to last column shows a percentage for each post in the list. That number represents the amount of people who did something (liked, clicked on, commented on) with that post verses the amount who basically ignored it. All I do at that point is go down the list looking for the posts with a higher percentage to know which are the best candidates for a boost.
Here is my Facebook Fan Page Insights section. In green, I’ve labeled the steps to get the Engagement Rate to show. In blue I’ve circled the score for my most recent post 11%.
The results are that my boosted posts now tend to always get a lot of engagements. If not always sales, I at least pick up more followers to my fan page as well as subscribers to my mailing list. I still get the occasional dud, but they are MUCH rarer.
Regards,
Daniel
P.S. If you liked this article, please consider signing up for my newsletter. I send it out every Wednesday and it includes links to my latest artworks, articles, and videos, as well as discounts, deals, and freebies!