In this video, I take you from start to finish on how I created a gnarled tree design using a variety of digital 3D rendering and painting techniques. Not only do I show you how I made it, but also, I touch on how I sell such art as a product using Zazzle.
In this lesson/tutorial I’ll cover some of the following topics:
Scupting and painting a tree model in Sculptris
Rendering of the tree model in Vue
Using Gimp and the Alpha map from Vue to create a transparent design.
Uploading artwork to Zazzle.com to sell as a coffee mug
In this video, I take you from start to finish on how I created my artwork “Deer on a Forest Path” using a variety of digital 3D rendering and painting techniques. Not only do I show you how I made it, but also, I touch on how I sell such art online.
One quick note, the buck model I used is not free, it is the Daz Buck, with Lyne’s remap (which is free).
In this lesson/tutorial I’ll cover some of the following topics:
Creating a forest scene in Vue
Posing a deer figure in Poser and transferring it to Vue
Using a Vue Z depth map for post production in GIMP
Creating sun beams and mist in GIMP
Fixing fur using a GIMP bristle brush.
Uploading artwork to FineArtAmerica.com
Scheduling a Facebook post to market your art.
This work has hundreds of likes and comments on FineArtAmerica. It sells WAY better than very similar works of mine will few comments and likes. It seems that people just take it more seriously when they see all those comments. That is Social Proof.I’ve mentioned before that there is no such thing as good or bad art. When it comes to an individual piece of art, there will be people who do like it and those who don’t. What you should be concerned about then is getting people to like your art. One of the best ways to get people to like your art is to show them that other people like it.
I know it sounds a bit like circular logic, but it tends to be true. People take their cues from others as to what is popular. If they see a lot of people paying attention to something, they too will want to see what all the fuss is about. This is a concept known as social proof.
When it comes to selling art online, there are a few ways that I’ve found to apply the concept of social proof.
Likes, Favorites, +1’s
One of the ubiquitous features of social network sites is the ability to the somehow indicate that you like someone’s post. On Facebook, its “liking” while on Twitter it’s called “favoriting”. Don’t forget: it’s not just those sites that are social networks, MANY sites are built on the social network architecture and will have a similar feature. For instance, FineArtAmerica.com has both a favorite and a like feature.
So how does this apply to social proof? Well, let’s say you’ve posted one of your works to a social media site. If visitors see that it has a lot of likes, they are likely to give it a closer look. In fact, Facebook, actually relies on the number of likes a post has received to determine whether or not to place your post in more of your friends/followers streams. They’ve actually institutionalized social proof in their system!
So how do you get likes on your posts? If you have a good following, you will naturally just get a few from your biggest fans, but if you want more, you’re going to have to be…well…social on social networks. Find other artists and like/comment on their works that you find appealing. Some of those artists will reciprocate.
Also, on some sites, you might want to send a personalized thank you message to anyone who likes your post. It will increase the chance that they will like more of your work.
Comments
Sometimes I see artists disable the comments on their posts. I think they’re crazy. This is a great opportunity to gain social proof.
Think of it this way: say you are looking to buy a book on Amazon and you’ve narrowed it down to two books. Otherwise equal, one has dozens of reviews, the other has none. Which one are you going to tend to pick?
You get comments on your posts the same way you get likes. Comment on other artists works that you like, thank people who comment on your work, and build a following.
If visitors see a lot of good comments about a work, they are going to be more likely to buy. That being said, delete all negative comments. Negative comments might put doubts in a potential buyer’s mind. And don’t leave negative comments on other artists posts either. It’s bad form all around.
Sales
One last way to have social proof of your art is to let everyone know when you make a sale. Sure, it may seem a bit like bragging, but you really should be proud of a sale anyway. After all, you just beat out the competition for someone’s wall space, and, when it comes to art, there is some pretty stiff competition.
So whenever you make a sale, post it on Facebook, tweet it out, mention it on Google+…let everyone know. A few people are inevitably going to come see what was so special about your art that someone actually paid for it.
Some sites may make this easier for you. For instance, FineArtAmerica.com has a nice feature that automatically generates an announcement page for any of your sales with buttons right on it to send it out on social sites.
One more thing you can do with this is also take the opportunity to publicly thank the buyer. Perhaps this will turn them into a returning customer.
So, after you’ve published a work online, put some work in to get it some social proof. When people see a lot of activity around your works, they’re much more likely to give it a closer look.
Regards,
Daniel
P.S. If you liked this article, please consider signing up for my newsletter. I send it out every Wednesday and it includes links to my latest artworks, articles, and videos, as well as discounts, deals, and freebies!
In this video, I take you from start to finish on how I created my artwork “Charging Polar Bear” using a variety of digital 3D rendering and painting techniques. Not only do I show you how I made it, but also, I tell you how you can sell print like it online.
In this lesson/tutorial I’ll cover some of the following topics:
Posing a figure in Daz Studio
Creating a snow scene in Vue
Transferring Daz figures to Vue
Using Photomatix to enhance the colors of your digital art
Using Topaz Impression to give your digital art the look of an Impressionist painting
Uploading artwork to FineArtAmerica.com
In this video, I give a digital art lesson that takes you from start to finish on how I created my artwork “The Leaving” using a variety of digital 3D rendering and painting techniques. Not only do I show you how I made it, but also, I touch on how to sell and market prints of it.
In this lesson/tutorial I’ll cover some of the following topics:
Creating a seascape in Vue
Posing a figure in Poser
Using the cloth room in Poser
Transferring Poser figures to Vue
Using Photomatix to enhance the colors of your digital art
Uploading artwork to FineArtAmerica.com
Using Hootsuite to schedule Facebook posts and Tweets
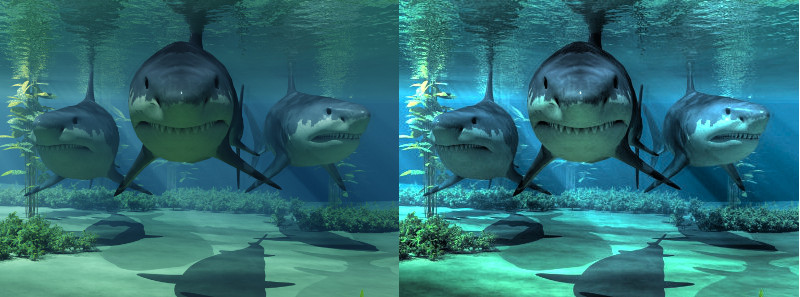
A before and after shot of using Photomatix to enhance an image. Note: clicking on the image will take you to the Amazon page for Photomatix. Photomatix is a tool used to create HDR images. HDR stands for High Dynamic Range. Essentially, the goal of HDR is to better mimic the way humans really see something. A regular photo only covers a certain range of values, and, as a result, areas in deep shadow or bright light lose detail. HDR solves this by combining under and over exposed images to recover that detail.
I, however, have found that Photomatix is really quite good at enhancing my digital art. I just create three versions of an image using image editing software: a light, dark, and middle value version. I then use Photomatix to recombine them. The result is quite often superior images in terms of both color and value. Above, you can see the results on one of my shark images. Notice how the colors in the “after” image on the right are so much richer, and the range of values much fuller.
If you’d like to try Photomatix, it’s available at Amazon:
Please note that this is an affiliate link, and I do get a small commission if you buy Photomatix from Amazon today. This will be at no extra cost to you. For those who do buy, THANK YOU!
Do you want to see me using in action. Check out this video that I made:
Okay, so the title is a bit of a pun. Obviously, there are many aspects of a scene that tell a story, but the one that I’m going to talk about today is lighting, specifically, the lighting styles known as “Low Key” and “High Key” and how they influence the mood of a scene. These two types of lighting generally involve the two most important lights in your scene, so we’ll talk about those first.
Key and Fill Lights
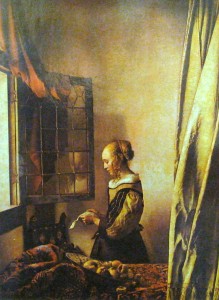
Vermeer loved to use the light from a window as the key light.(Note: This image links to Amazon)
The Key Light
The most important light in your scene is most often your key light. The key light is the light that defines the forms in the scene. It strikes the subjects of a scene from an angle and defines the edges of your picture’s elements. In outdoor settings, the sun usually acts as the key light. On a stage, it’s the main spotlight on the actors. In an interior it might be the light from a window or just a lamp positioned to define the edges of forms.
The fill light
The fill light is a light that is used to control the level of the shadows in a scene. It generally comes from somewhere around the front of the scene and points back or up into it. It might seem to come from where the viewer is standing, the floor in front of a subject, or perpendicular in the scene to the key light. Generally it is less bright than the key light and softer. In an outdoor scene, the fill light may actually still be sunlight, only rather than direct sunlight, it is the sunlight reflected off the ground or other elements of the scene.
Other Lights
There are of course other possible light sources in a scene, such as back/rim lights and kickers, but they play less of a role in the determining high vs low key. I thought I should mention them though so you don’t get the idea that you only ever have two light sources in a scene.
Low Key Lighting
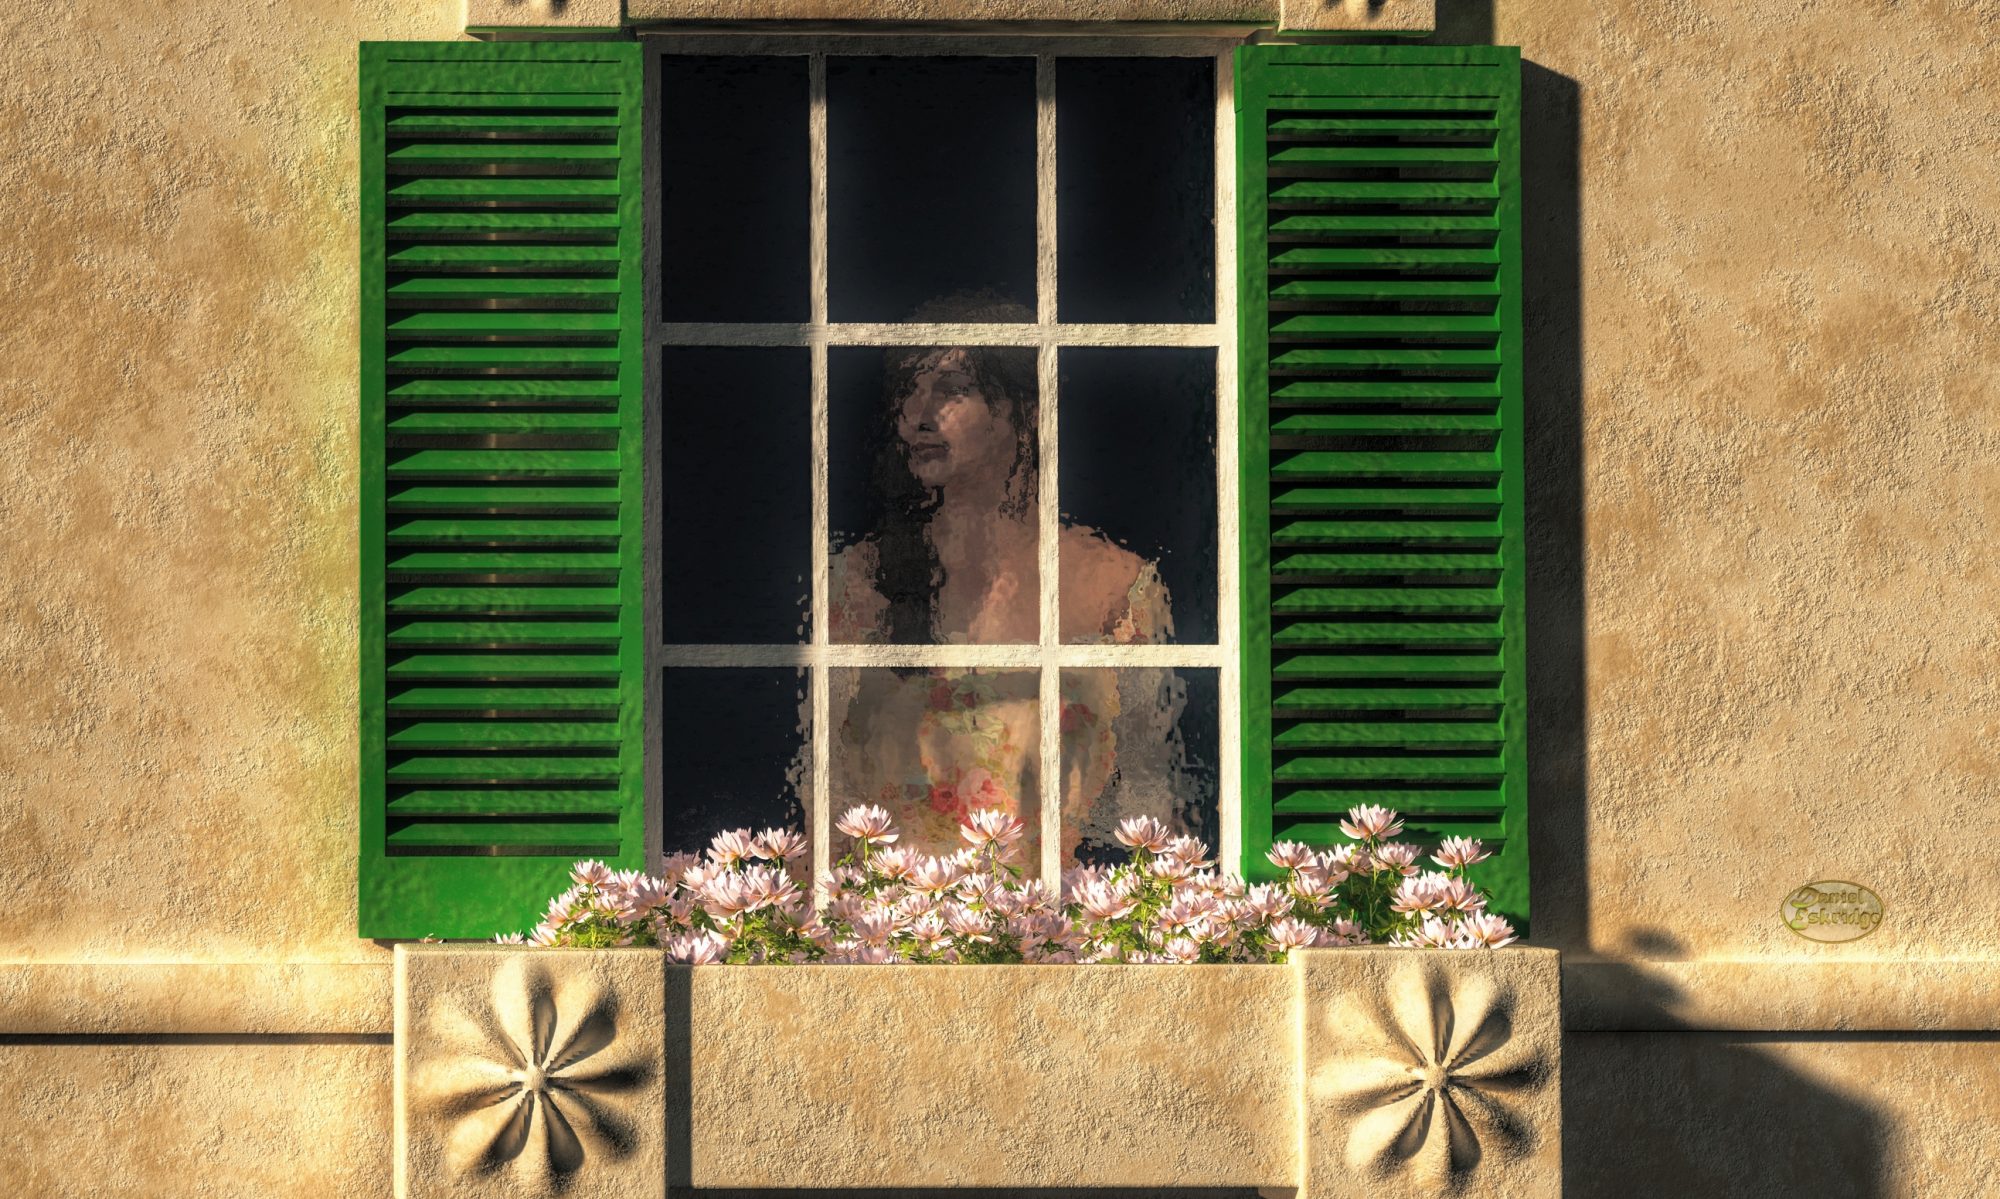
Woman Facing a Skull
In low key lighting, the fill light is generally turned down very low. This creates deep shadows in the scene. The emotional effect is one of drama. Low key lighting tends to be used for scenes in mysteries, thrillers, horrors or tragedies.
In the image “Woman Facing A Skull”, I’ve used low key lighting. Even though she has a neutral expression, there is still a sense of foreboding or even sadness. The skull seems to have an effect on her. The depth of the shadows in such a scene gives the viewer a subconscious sense of the depth of the emotions involved as well.
High Key Lighting
Woman Examining a Skull
High Key lighting is lighting where the key light and fill light are roughly evenly bright. In this style, the scene has shadows that are not very dark or even barely exist. This is the kind of lighting you use to portray scenes that tend to be emotionally lighthearted. This is the kind of lighting for comedic, whimsical, or just plain happy scenes.
You can also use it for indicating a sense of clinical detachment. For instance, in the image “Woman Examining A Skull”, I’ve used high key lighting. It’s the same scene as “Woman Facing a Skull”, but now it looks like she is just casually examining the skull.
Wrap up
Now, obviously, there was more I could have done to differentiate the moods of the two images of the woman with a skull. The lighting style is only one element that you can control in a scene. To tell more of a story, you’d probably need to do more. For instance, I could have given her face more expression and changed the camera angles to considerably more effect, but I am trying to show how you can do quite a lot with just lighting.
Also keep in mind that high key and low key lighting are not absolutes. Rather, they represent two directions. In high key lighting the ratio of lighting tends to favor your key light, whereas low key lighting tends to be closer to 1:1, but there are no set number for those ratios. Rather you can determine the emotional depth of a scene moving in one direction or another.
Regards,
Daniel
P.S. If you liked this article, please consider signing up for my newsletter. I send it out every Wednesday and it includes links to my latest artworks, articles, and videos, as well as discounts, deals, and freebies!
In this video art tutorial, I take you from start to finish on how I created my artwork “Allosaurus in a Forest” using a variety of digital 3D rendering and painting techniques. Not only do I show you how I made it, but also, I touch on how I sell such art online.
In this lesson/tutorial I’ll cover some of the following topics:
Creating a forest scene in Vue
Posing a dinosaur figure in Poser and transferring it to Vue
Using a Vue Z depth map for post production in GIMP
Uploading artwork to FineArtAmerica.com
One of the most important things you can do to sell your art online is to build a mailing list. This is a list of email address to which you send newsletters, articles, announcements, and whatever else regarding your art business. For instance, I send out a weekly newsletter in which I tell my subscribers about any new art, articles, and videos that I published that week, as well as about discounts and specials. I also offer a free computer desktop wallpaper each week as a gift.
Why A Mailing List Beats Social Media
Having a mailing list is important for two reasons:
It is a resource that you own. With your followers on social networks, you are at the mercy of site. For instance, this past year, Facebook changed the way it determines when to show your posts to your follows. The result has been that only 20% or so of your followers now see your posts to your Facebook fanpage (unless you pay to “boost” your post). With your own email list, you can’t be crippled by someone else that way.
Your subscribers have to somehow deal with the mail you send them. This is unlike social network posts where your followers can simply ignore your posts as they cycle off their stream. With an email, the recipient has to open it, delete it, mark it as spam, or leave it in their inbox forever.
Opting In: How People Get on Your Mailing List
People choose to get on your list by giving you their email address. This is called “Opting in”. Never send emails about your art business to people who have not opted in to your list. That’s called “spamming” and it is a huge NO-NO.
There are a couple of ways people can opt into your mailing list. One is for them to just tell you their email address. For instance, you might meet someone in public who expresses an interest in your art and, after some conversation, they write their email address on a piece of paper for you or give you a card. The other, though, is more useful online: you have some sort of form on a website where people can submit their email address and perhaps their name.
If you have a Fine Art America account, they do have an email campaign feature. The form for visitors to sign up on you list can be reached from a link just below your picture on your profile. FAA’s email campaign system is pretty bare bones though, and emails show as coming from “donotreply@fineartamerica.com”. So if you use your FAA profile to be your Opt-In form for your email list, then I recommend moving the emails you get there into a better email campaign manager.
If you don’t want to use the FAA form, you can always create one through an email campaign management site. You’ll have to have a blog or website that allows you to add forms to it though. However, this can really be a better way to handle things as the email campaign managers allow you to set up autoreponders that automatically send confirmation emails and introductory emails to anyone who signs up using the form.
Email Marketing Campaign Managers
Email campaign managers are websites where you sign up for an account. Once you’ve done that, you can manage your email list through it and generate and send emails to the people on your list. They also allow you to set up autoresponders which are scheduled emails that are automatically sent to people who sign up on your list.
The two big sites that I see used are:
MailChimp
MailChimp is nice in that you can use it for free until your email list grows to over 500 subscribers. The forms are a little basic, but still easy to make using a wizard on the site. Setting up autoresponders however, requires you to use one of their pay models.
AWeber
AWeber seems to be what all the pros use. It does not have a free tier, but does allow you to use it for $1 for the first month and $20 per month there after. It seems to have better form generation capability as well as a better system of setting up autoresponders. Also, I’ve heard from those that have used both AWeber and Mailchimp that AWeber mails are less likely to automatically wind up in spam boxes.
A lot of the bloggers that I follow who talk about online marketing insist that your email list is your most important resource. For artists, I would say it comes in third behind your art, then the text around your art (the title, keywords, and description). Still through it is VERY important. So, when you are coming up with your marketing plan don’t forget to include a mailing list.
Regards,
Daniel
P.S. If you liked this article, please consider signing up for my newsletter. I send it out every Wednesday and it includes links to my latest artworks, articles, and videos, as well as discounts, deals, and freebies!
In this video, I take you from start to finish on how I created my artwork “Mustang Canyon” using a variety of digital 3D rendering and painting techniques. Not only do I show you how I made it, but also, I touch on how to sell and market prints.
In this lesson/tutorial I’ll cover some of the following topics:
Creating a canyon landscape in Vue
Posing a horse figure in Poser and transferring it to Vue
Using a Vue Z depth map for post production in GIMP
Adding a mane and tail in GIMP
Adding splashes to an image in GIMP
Uploading artwork to FineArtAmerica.com
Using Hootsuite to schedule Facebook posts and Tweets